After some hacking I have now released Dynamic DynamoDB!

It is filling the gap of auto-provisioning reads and writes to tables in AWS’s DynamoDB offer. So you can tell Dynamic DynamoDB to scale up and down when the consumed reads or writes reaches a certain level. An example. Let’s say you have way more traffic on your database during sales hours 4pm - 10pm. DynamicDB can monitor the increased throughput on your DynamoDB instance (via CloudWatch) and provision more throughput as needed. When the load is reducing Dynamic DynamoDB will sence that and automatically reduce your provisioning.

Installation

It is super simple to install Dynamic DynamoDB through PyPI:

pip install dynamic-dynamodb

Configuration

All configuration is done using command line options (for now, there is a feature request to implement configuration files). See dynamic-dynamodb --help or the Dynamic DynamoDB webpage for a list of all options.

AWS access keys are read via boto so any place where boto can read them is OK. Check out the boto credentials documentation for more information.

Feedback and questions

I am always happy to get feedback, bug reports, feature requests or just cheers. You can me or reach out via GitHub for example.

GitHub is a wonderful service for hosting your Git repositories. In fact it is not only good at hosting repos, in my case it even hosts this blog :). However, we needed to migrate an existing repository from a self-hosted Git installation to GitHub. Here’s the instructions for doing the migration.

The first thing you need to do is to create an empty git repo at GitHub. You do not need to initialize it, just create it. Then clone your existing repo to you local computer:

git clone old-repo.host.com:/var/git/my_repo my_repo
cd my_repo
for branch in $(git branch -r | grep -v HEAD | cut -c 10-) ; do git checkout $branch ; git pull ; done

Add GitHub as a remote

git remote add github :avail-labs/avail.git

And push all code and tags to GitHub

git push --force --all github
git push --tags

Note that pushing a big repo to GitHub might take some time. It seems like GitHub is throttling the incoming requests slightly.

You will need to update your local Git configuration to point at GitHub instead of your old repo, when the repo has been pushed to GitHub. This command will do the trick

git remote set-url origin :gh-account/gh-repo.git

The URL can be copied from your GitHub repo’s web interface.

Happy coding!

I ran into one of the most wonderful features in Sublime Text 2; automatic trailing space removal on save! It is really easy to configure. Just open your settings (cmd + , on Mac OS X) and add "trim_trailing_white_space_on_save": true:

{
    "color_scheme": "Packages/Theme - Phoenix/Color Scheme/Tomorrow-Night.tmTheme",
    "font_size": 18.0,
    "ignored_packages":
    [
        "Vintage",
        "SublimeLove"
    ],
    "rulers":
    [
        80
    ],
    "tab_size": 4,
    "theme": "Soda Dark.sublime-theme",
    "translate_tabs_to_spaces": true,
    "trim_trailing_white_space_on_save": true
}

I just released a MongoDB pipeline for Scrapy, called scrapy-mongodb. The module supports both regular MongoDB deployments as well as replica sets. When logging your items with scrapy-mongodb you will instantly see the collected items in MongoDB. This post will show you how to use it in your Scrapy project.

See the scrapy-mongodb GitHub page for source code and additional documentation.

Installing scrapy-mongodb

The installation is straight forward. You simply install scrapy-mongodb using pip:

pip install scrapy-mongodb

Note that you might need to run pip as administrator.

Option 1: Configuring scrapy-mongodb for single MongoDB instances

We need to know some details about the MongoDB database that you want to store your items in. So update your Scrapy settings.py with the following:

MONGODB_HOST = 'localhost'
MONGODB_PORT = 27017
MONGODB_DATABASE = 'myDatabaseName'
MONGODB_COLLECTION = 'myCollectionName'

If you want us to create and use a unique key for your items, please add the following setting as well:

MONGODB_UNIQUE_KEY = 'keyName'

scrapy-mongodb will automatically ensure an index on that key.

Then we need to tell Scrapy to use the new pipeline. Add the following to your settings.py file:

ITEM_PIPELINES = [
    'scrapy_mongodb.MongoDBPipeline',
]

Additional configuration options can be found at https://github.com/sebdah/scrapy-mongodb.

Option 2: Configuring scrapy-mongodb for MongoDB replica sets

If you are logging the items to a MongoDB replica set, you will need to configure scrapy-mongodb to be replica set aware. Update your Scrapy settings.py with the following:

MONGODB_REPLICA_SET = 'replicaSetName'
MONGODB_REPLICA_HOSTS = 'h1.example.com,h2.example.com,h3.example.com'
MONGODB_DATABASE = 'myDatabaseName'
MONGODB_COLLECTION = 'myCollectionName'

If you want us to create and use a unique key for your items, please add the following setting as well:

MONGODB_UNIQUE_KEY = 'keyName'

scrapy-mongodb will automatically ensure an index on that key.

Then we need to tell Scrapy to use the new pipeline. Add the following to your settings.py file:

ITEM_PIPELINES = [
    'scrapy_mongodb.MongoDBPipeline',
]

Additional configuration options can be found at https://github.com/sebdah/scrapy-mongodb.

Summary

Done! Now start your spider just as usual and have a look in MongoDB for your items. They will show as soon as the spider has found and processed them, so you can see the progress as the spider crawls :).

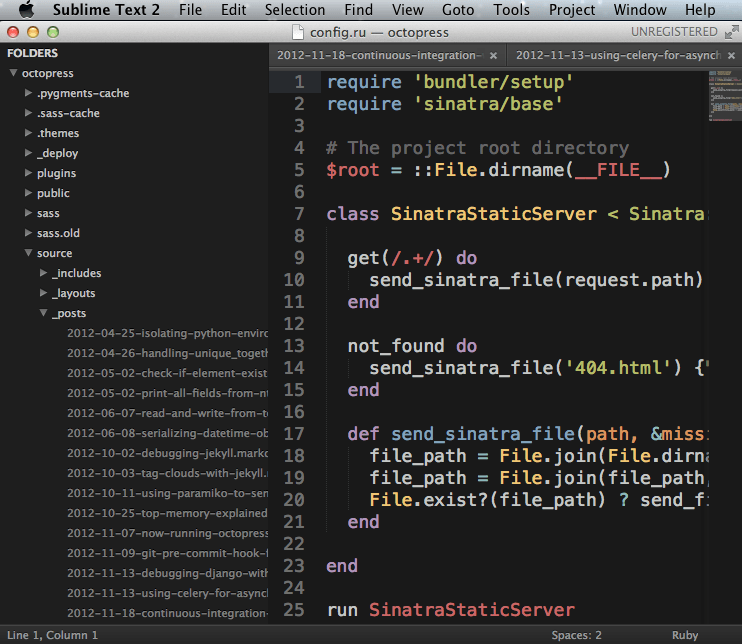
I’ve been running Sublime Text 2 for quite some time now. It quickly replaced my TextMate environment. Sublime is great out of the box, but there are some extensions and styling I can’t do without. Here is what my environment looks like at the moment:

Plugins

Sublime Package Control

Website: http://wbond.net/sublime_packages/package_control

The package control plugin is the best way to install any other plugins later on, so start with installing it. There are good step-by-step instructions at the plugins’ webpage. Actually, this plugin is so essential that I think it should be part of the Sublime core.

When the plugin is installed, just hit cmd + shift + p (on a Mac OS X machine). Then type package control to find all the options for the plugin. You can search for and install packages via Package Control: Install Package.

Styling: Theme Soda Dark

Website: https://github.com/buymeasoda/soda-theme

To get the nice dark side bar, install Theme Soda from the package manager (or via the link above). To enable the theme, add the following line to your preferences:

"theme": "Soda Dark.sublime-theme"

Styling: Tomorrow night color scheme

In order to get nice syntax highlighting, install the Tomorrow Night color scheme. The best version of it - that I have found at least - is in the package Theme Phoenix (which can be installed via the package manager). Then add this line to your preferences:

"color_scheme": "Packages/Theme - Phoenix/Color Scheme/Tomorrow-Night.tmTheme"

Remove trailing white spaces

This is absolutely fantastic, it removes all trailing white spaces when you save the file.

"trim_trailing_white_space_on_save": true

Website: https://github.com/titoBouzout/SideBarEnhancements

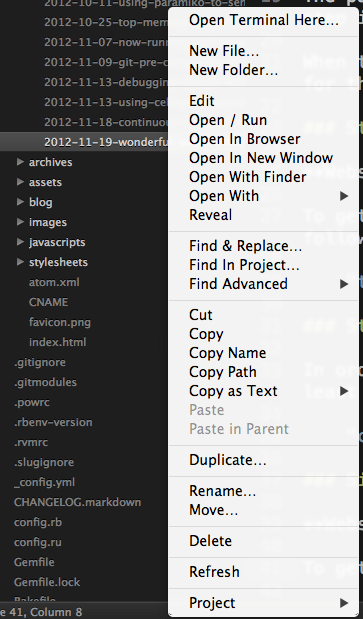
To get more options in the sidebar (like the example below), you should install the Sidebar enhancements plugin.

Linting with sublimelint

Website: https://github.com/lunixbochs/sublimelint

I usually use Sublimelint to lint my Python code inline. It is fairly PEP-8 compatible and I have found it to be good at finding syntax or formatting errors in Python.

Rope for Sublime

Website: https://github.com/JulianEberius/SublimeRope

The developer of the plugin describes the plugin: “Adds Python completions and some IDE-like functions to Sublime Text 2, through the use of the Rope library.”

I use it for simple refactoring tasks and it does a good job.